
Speakers are essential to our everyday listening experience, whether you’re watching a movie, enjoying music, or presenting at work. But like all electronics, they’re prone to occasional failures. The good news? Not every issue means it’s time to toss them out.
Many speaker problems can be solved at home with some basic tools, a little patience, and a clear step-by-step approach. Whether it’s a Bluetooth speaker, bookshelf unit, or desktop monitor, simple repairs can restore audio clarity and save you money.
In this guide, you’ll learn how to diagnose common issues, perform safe repairs, and maintain your speaker for long-term use. Even if you’re not super tech-savvy, you’ll be surprised by how much you can fix yourself.
Common Speaker Issues You Can Fix
Before diving in, it helps to know which problems are usually fixable with basic DIY methods. Here’s a quick overview of the most common speaker issues you can repair at home:
- No Sound or Intermittent Audio: Often caused by loose wires, faulty connectors, or damaged solder joints.
- Distorted or Crackling Sound: Usually a sign of debris in the speaker, torn cones, or amplifier issues.
- Buzzing or Vibration Sounds: May come from loose panels, damaged foam surrounds, or poor mounting.
- Physical Damage to Cones or Dust Caps: Small tears or dents can often be patched without replacing the entire unit.
- Loose Terminals or Poor Wire Contact: These result in signal loss and reduced sound quality, but are easily fixable.
These issues don’t always require a technician, and tackling them yourself can be very satisfying.
Safety First: What to Do Before Opening a Speaker
Before you begin repairs, safety should always come first. Speakers may seem harmless, but opening them without caution can lead to damage or even injury.
- Unplug All Power Sources: Always disconnect the speaker from outlets or batteries.
- Discharge Capacitors: For active speakers or subwoofers, be aware that internal capacitors may hold a charge.
Capacitor Safety – How to Discharge Capacitors Safely
- Work on a Clean, Static-Free Surface: Static electricity can damage sensitive components.
- Use the Right Tools: Avoid makeshift items; stick with proper screwdrivers, spudgers, or pry tools.
- Never Force Components Apart: If something feels stuck, there’s usually a hidden screw or clip. Be patient.
Tools and Materials You’ll Need
Having the right tools on hand makes the job smoother and reduces the risk of accidental damage. Here’s what you’ll typically need:
- Screwdrivers (various sizes) – For removing screws without stripping them.
- Soldering iron and solder – Useful for reconnecting wires or fixing joints.
- Multimeter – For testing electrical continuity and diagnosing faults.
- Adhesive or rubber cement – Ideal for patching cones or dust caps.
- Replacement foam or dust caps – Common wear items in aging speakers.
- Small brush or air blower – For cleaning dust and debris from inside components.
A small investment in tools can save big in speaker replacements.
Step-by-Step: Diagnosing the Problem
Before grabbing a tool, it’s essential to diagnose the issue properly. Misidentifying the problem can waste time, or worse, damage the speaker further. Here are key steps to zero in on the fault:
- Check your audio source. Try another device to rule out input problems.
- Swap cables or ports. Faulty wires or AUX ports are often the silent culprit.
- Switch speaker channels. Connect the right channel to the left output to isolate issues.
- Inspect terminals and wires. Loose or frayed wires can interrupt signal flow.
- Use a multimeter. Test the speaker’s resistance (ohms) to see if the driver is dead.
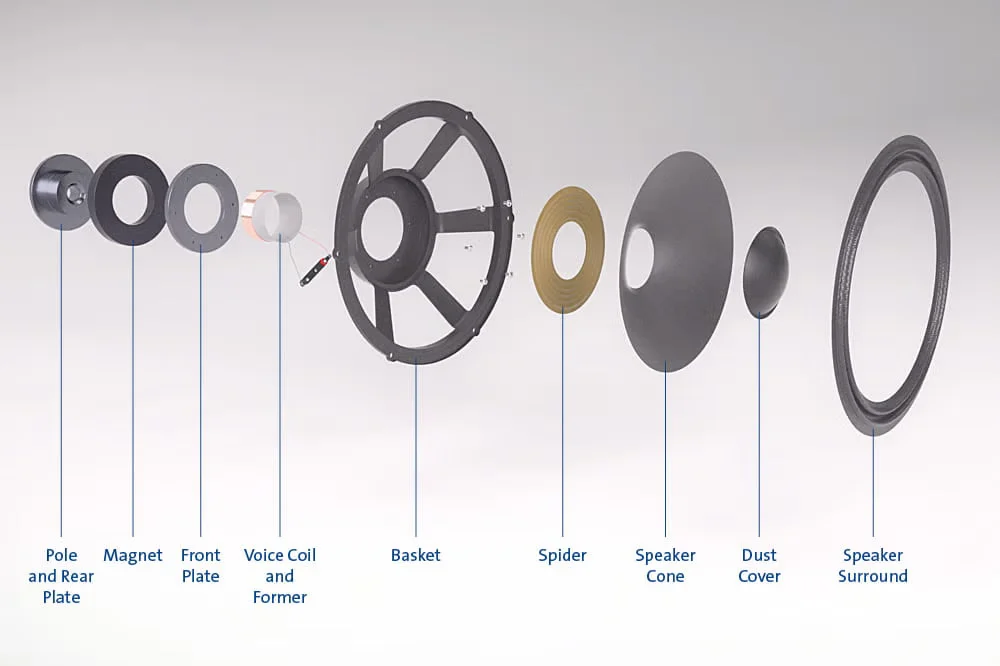
- Visually inspect the cone and the surroundings. Look for tears, separation, or warping.
- Lightly press the cone inward. If you hear rubbing or grinding, the voice coil may be damaged.
By methodically walking through each step, you can rule out simple issues first. Some problems might stem from the amplifier, not the speaker, so always verify the signal chain. Once you identify the root cause, repair becomes much easier and safer.
Step-by-Step: Fixing Common Problems
After identifying what’s wrong, you can begin fixing it. Below are some of the most common speaker repairs and how to perform them safely.
A. Reconnecting or Resoldering Wires
Tools needed:
- Soldering iron and solder
- Wire stripper
- Heat shrink tubing (optional)
Steps:
- Disconnect all power.
- Strip and clean wire ends if needed.
- Heat the joint and apply fresh solder.
- Cover with heat shrink tubing or electrical tape.
Caution: Avoid applying too much heat, which can damage the driver or nearby components. Let solder flow smoothly without forcing it.
B. Repairing a Torn Cone or Dust Cap
Tools needed:
- Rubber cement or specialized speaker glue
- Soft brush or cotton swab
- Tweezers
Steps:
- Clean the torn area gently.
- Apply glue thinly along the tear.
- Press gently until bonded.
- Let it cure fully before testing.
Caution: Never over-saturate the dust cap or cone area with glue, as it may stiffen the cone and alter sound response.
C. Replacing Foam Surrounds
Tools needed:
- Replacement foam rings
- Adhesive
- Craft knife or scraper
Steps:
- Remove old foam and clean residue.
- Align the new foam and apply adhesive.
- Press evenly and let it cure.
Caution: Ensure perfect alignment. A misaligned surround may cause coil rubbing or poor sound clarity.
D. Fixing Buzzing or Vibration Issues
Tools needed:
- Screwdriver
- Foam tape or padding
- Glue (if necessary)
Steps:
- Tighten all screws around speaker housing.
- Add padding to rattling panels.
- Re-glue any loose internal parts.
Caution: Test each adjustment by playing audio to confirm improvement before sealing things back up.
When to Replace vs. Repair
Not every speaker is worth saving. If the voice coil is burnt out or the magnet is damaged, repairs become complex and costly. Budget models often cost less to replace than to fix.
If you’ve already replaced components and the sound still distorts or cuts out, the issue might be internal circuitry. In such cases, replacing the speaker may be the smarter choice.
On the other hand, high-end speakers, vintage gear, or units with sentimental value are often worth repairing. Consider repair when replacement parts are affordable and available, and when you’re confident the core components are still in good shape.
Tips for Testing After Repair
Once the fix is done, it’s time to see if the speaker performs well. Don’t just plug it in and crank the volume. Be methodical.
Start with a moderate volume and play a consistent audio track. Use both channels (if stereo) and check balance, clarity, and volume. Let the speaker run for 10–15 minutes to spot hidden issues.
Look out for:
- Any new distortion or vibration
- Imbalanced audio between channels
- Loose connections or crackling
Make minor adjustments and retest if needed. Testing helps ensure the repair was successful and your speaker is safe for everyday use again.
Preventive Care to Avoid Future Damage
Speakers last longer with the proper care. Prevention takes less time than repairs and keeps your sound system in peak condition.
- Keep them dry and away from moisture. Humidity is a significant cause of cone and coil damage.
- Avoid overpowering. Pushing a speaker beyond its limits burns the coil and damages components.
- Clean regularly. Dust buildup inside ports and grills affects performance.
- Inspect wires occasionally. Loose or frayed connections cause intermittent faults.
With just a little effort, your speakers will stay louder, longer, and without the need for frequent fixes.
Conclusion
Repairing a speaker may seem intimidating, but it’s often much easier than expected. From basic wire fixes to foam replacements, many issues are entirely manageable with a few tools and a steady hand.
By diagnosing the problem step by step, following safe practices, and testing carefully, you can restore your speaker to working condition and extend its life in the process.
Not all speakers are worth fixing, but when they are, doing it yourself can be rewarding. Plus, it saves money and keeps electronics out of landfills. With practice, speaker repair can become a valuable (and surprisingly fun) skill.
